
Map
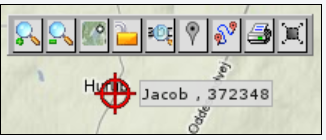
The map is a significant part of the FleetSystem system. It shows where objects are located in real time, which route an object has been driving, where the different zones are set up, etc.
The map normally comes in two formats. When the map is dominating the screen, it plays a significant part of the page. When the map appears in a smaller version in the corner of the page, it serves as additional information alongside the content on the page you’re viewing.
Navigation
The easiest way to navigate the map is by using the drag-and-drop technique. To do this, move the mouse cursor to an area of the map, hold down the left mouse button, and — while keeping the button held down — move the cursor in the direction opposite of what you want to show on the map. This works once the mouse cursor has turned into the shape of a hand. You can also use the mouse wheel to zoom in and out of the map.
Map menu
The map menu is located in the top left-hand corner of the map. It contains several options for making better use of the map. Different pages can show different symbols.
The most common functions:

Zoom. The symbols containing a magnifying glass with a small plus or minus icon are used to zoom in or out of the map. The map zooms in or out relative to the center of the screen.
Map type. There are four map types to choose from: Standard map, Satellite, Satellite with road information, and Terrain. Choosing one only changes the appearance of the map — all other functions remain the same regardless of map type.
Lock the map. When the map is in a locked position, it will always try to keep all objects within the map’s limits, or alternatively keep one object centered. This means the map will move back to its original position after you release it following a drag. When the padlock is unlocked, you can move the map freely — in this position the map will not follow moving objects, and those objects can eventually move outside the visible map view.
Search. The search function normally searches by POI name or address. When a search returns several hits, a dialog box opens so you can choose the correct result.
Points of Interest (POI). The POI view is normally turned off for performance reasons. Clicking the POI icon shows all visible POIs within the map’s current zoom level. If POIs aren’t shown on the map, zoom in further or reprioritize the POI group.
Print. The print function prints only the map and its icons. The printout is adjusted to the chosen print medium and may differ slightly from the on-screen view.
Full screen. Switches the map to full-screen view. No other information is available in this mode.
Map symbols

The map uses different symbols, shapes, and colors to show where objects are located and what status they have:
Red. Indicates that ignition is off. These objects will normally not move. If an object with a red symbol does move, this might indicate it’s being towed, on board a ferry, etc.
Green. Indicates that ignition is on. If the object is moving, this is represented by a blue arrow inside the icon, which also indicates direction.
Grey. Indicates that the unit is inactive — these are objects that haven’t reported to the system in at least the last 24 hours. There are various reasons this can happen, but a typical example is that the unit has been without power for an extended period.
Yellow. Objects with a yellow symbol are hidden in the system. Hidden objects show only their last registered position before being hidden, and they won’t appear in the tracklog, etc. Hiding objects requires a separate FleetSystem module.
Cross. Applies to all colors. Available only for customers with the busy/free functionality — objects with a cross are considered busy, while objects with a circle are considered free.
Navigation
Main menu
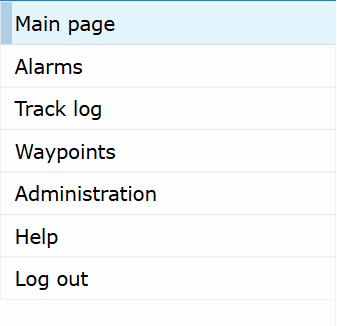
The main menu, on the left side, is used for navigation throughout the system. It always shows the active page with a slightly brighter color, and the active page’s name also appears above the main menu in the top left corner of the page.
Some menu items have submenus. These can be dynamic and change depending on the solution shown — for example, the menu choices for the main page always show the last five objects shown; once more than five objects have been shown, the oldest is replaced by the newest.
All menu items are available regardless of where you are in the system. Any unsaved information in the various fields will be lost when you move from one page to another.
The menu is structured so that information about single objects (e.g., tracklog and documents) is found directly under that object, which in turn is located under “Main page.” Information covering all objects (e.g., alarms and service) is placed further down the main menu. System configuration is under “Administration,” where you’ll also find user and company settings.
Which menu items are shown depends on the access each customer has to the different modules.
List navigation
Some lists also act as menus for other pages. For example, “Objects” on the main page is one such list — these lists are clickable and lead you to more information about what the line describes. For instance, the object list on the main page leads to more object details.
User interface
Block menu
You can access a block menu by clicking the round symbol or right-clicking the top line. A block menu usually contains both general functions and functions specific to the list or block in question.
General functions:
- Refresh — refreshes the content in the block or list without refreshing the whole FleetSystem page.
- Order by — shows a submenu of sortable parameters. Choosing one sorts the list by that parameter; choosing the same parameter again reverses the sort order.
- Export to Excel — lets you download the content in a Microsoft Excel–compatible format.
- Select columns — lets you choose which fields are visible in the view.
- Create new tab — creates a new tab with its own list view.
Lists
A list consists of three elements the user can influence:
- Tabs — there can be tabs above the list, either because the view includes them or because the user created them. Switch tabs by clicking.
- Sortable fields — fields that are sortable can be sorted by clicking the field name; the mouse pointer changes appearance when moved over a sortable field. Clicking the field title again reverses the sort order.
- Line menu — lines with their own attached functions have a menu connected to the arrow at the start of the line. The line menu is also available by right-clicking the line.